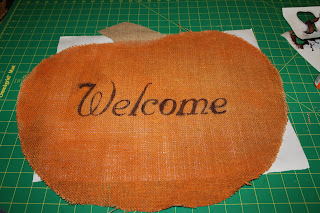
First I took a piece of freezer paper and drew the shape of the pumpkin I wanted and cut it out. I pinned it on a double layer of burlap so I would cut out both the front and the back piece at the same time, and cut out the burlap pumpkin.
I then took orange acrylic paint and watered it down to where it was just water consistency. I misted the burlap with water so it would be easier to paint. I wanted it to just stain the burlap.I painted both sides. Don't for get to flip the second one over so the stem faces the opposite direction that way when you sew them together the outside is painted on both pieces of burlap.
I am very impatient when it comes to a project that I am excited about. I messed up here by not letting the orange paint dry all the way before trying to stencil the letters on. So, when you make yours make sure you let the paint dry....
I cut a stencil of letters out of freezer paper. Once the Orange paint is dry iron on the stencil. The freezer paper will peel off once you paint the letters on. I stenciled the letters in brown acrylic paint.
Here is why you let the orange paint dry and DO NOT water down the brown paint or whatever you choose to do the letters in.
The top leg of the W in welcome bled because the orange was wet. So, that was a fail.. Never fear though, I have the other side of the pumpkin. I decided to cut another freezer paper stencil.
I stenciled this one when it was dry and it worked beautifully. I also decided to water down the rest of the brown paint and paint the stem. Because I am a southern girl... I decided to change the saying to Happy Fall Y'all!
Once the letters are dry (sorry no pictures of this step) I pinned the wrong sides together so it all matched. I also took about a 6 inch piece of jute and made a loop that I pinned in the top of the stem so it would be sewn in as a hanging loop. I sewed all the way around but left about a 5 inch gap in the bottom where I stuffed it with poly-fil. I just wanted enough to give it dimension, not to stuff it full. I then went back and sewed up the bottom. I added a little jute bow around the top of the stem.
I think it turned out pretty well.
Linking Up To:


