Southern Girl Creations

Saturday, October 22, 2011

Happy Fall Y'all

I needed something to hang on the front door for fall...  I decided to make a burlap pumpkin.


First I took a piece of freezer paper and drew the shape of the pumpkin I wanted and cut it out.  I pinned it on a double layer of burlap so I would cut out both the front and the back piece at the same time, and cut out the burlap pumpkin.


I then took orange acrylic paint and watered it down to where it was just water consistency. I misted the burlap with  water so it would be easier to paint.  I wanted it to just stain the burlap.

I painted both sides. Don't for get to flip the second one over so the stem faces the opposite direction that way when you sew them together the outside is painted on both pieces of burlap.
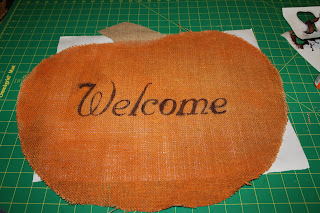
I am very impatient when it comes to a project that I am excited about.  I messed up here by not letting the orange paint dry all the way before trying to stencil the letters on. So, when you make yours make sure you let the paint dry....
I cut a stencil of letters out of freezer paper.  Once the Orange paint is dry iron on the stencil.  The freezer paper will peel off once you paint the letters on. I stenciled the letters in brown acrylic paint.


Here is why you let the orange paint dry and DO NOT water down the brown paint or whatever you choose to do the letters in.

The top leg of the W in welcome bled because the orange was wet. So, that was a fail.. Never fear though, I have the other side of the pumpkin.  I decided to cut another freezer paper stencil.

I stenciled this one when it was dry and it worked beautifully.  I also decided to water down the rest of the brown paint and paint the stem. Because I am a southern girl... I decided to change the saying to Happy Fall Y'all!

Once the letters are dry (sorry no pictures of this step) I  pinned the wrong sides together so it all matched.  I also took about a 6 inch piece of jute and made a loop that I pinned in the top of the stem so it would be sewn in as a hanging loop.  I sewed all the way around but left about a 5 inch gap in the bottom where I stuffed it with poly-fil.  I just wanted enough to give it dimension, not to stuff it full.  I then went back and sewed up the bottom.  I added a little jute bow around the top of the stem. 

I think it turned out pretty well.


Linking Up To:

Thursday, October 20, 2011

Smurf-Day (Birthday) Party

This Past Saturday we had a 6th Smurf-day party.  I wanted to share some of it with you. 

This was the cake.  It was made by Cakes by Mom and Me. They always do a beautiful job.  I believe in doing business with those that do business with you.  I embroider their logo on items and in turn I always let them make the birthday cakes...


Now let me tell you about the treats. My original idea came from My Paper Pony. I was supposed to use donut holes cut in half, dipped in red candy melt. Go look at the link above.. They are beautiful!  I am obviously not nearly as talented as the lady that did the marshmallow mushroom pops from this site.  I tried... I really did... but they were hideous! So I threw 40 of them away...  and I kicked myself for waiting until the last minute and at the time I had no backup plan.. 
Ahhh but Saturday morning before the party I came up with an idea.  Here is what I did. (note: they are not as beautiful as the donut hole ones but they worked)
I used the recipe on the back of the Rice Crispy box to make Rice Crispy treats.  I altered the recipe by adding red food coloring to the melted marshmallow mix.  I also used about a cup less rice crispys so they would be nice and red.  Here is how they turned out. I scooped them out using a cookie scoop and flattened them on the bottom by pressing them onto a piece of wax paper.  I allowed them to cool a bit and then pushed white chocolate chips in to make the dots on top(note: if you do this too soon they will melt).  I then pushed a jumbo marshmallow onto the lollipop stick and then added the rice crispy treat to the top.
 I bagged them and tied on a bow so the kids could take them home and the marshmallow bottom wouldn't dry out. 
I then put them in a tray with a Styrofoam insert covered in green moss.  I added some of Savannah's little Smurfs from McD's for a little extra touch ( you can't really see them in the picture)


Saturday, September 24, 2011

Bucket of Burpies

I am so sorry I have been MIA the last month...  We started kindergarten, we have already had colds and a round of strep throat... and have been so busy it seems like there is something always going on.  I also feel like I have hit a creative dry spell.  I hope this project has broken the dry spell...  I am pretty excited!  There is a baby shower tomorrow that I needed a gift for.  I have already embroidered several other peoples gifts for the shower so I needed something a little different.  I made these burp cloths from Chenille and coordinating dot and striped fabric...

here is how I decided to present  the gift


It took 6 of the burp cloths to fill up the clear gallon sized paint bucket.  I hope they like it as much as I do!

Friday, July 29, 2011

Banana Bread

I know there are hundreds of thousands of banana bread recipes out there, but this is my favorite.  I have a bad habit of not eating all the bananas up that I buy.  This is mainly due to the fact that I will not eat a banana once it gets a brown spot on it.  It is totally a texture thing. So, once they have brown spots they go into banana bread or banana freeze(I will do a post with this recipe it is so good).

Banana Bread

3/4 Cup Butter
1 1/2 Cups of Sugar
4 Eggs
3 Cups of Flour
1 1/2 Teaspoons of salt
1 1/2 Teaspoons of baking Soda
4 Bananas
1 1/2 Teaspoons of Vanilla

Grease and Flour 2 loaf pans. Cream butter sugar and eggs.  In separate bowl combine the dry ingredients Flour, Soda, and salt mix well.  Gradually add the dry ingredients to the creamed butter sugar and eggs mixing well as you go.  Mash the bananas with the vanilla and fold into your batter. Pour batter evenly into your two loaf pans and Bake at 350 degrees for 45 - 60 minutes.  or until toothpick inserted in center comes out clean.


Sunday, July 24, 2011

Hidden Treasure...

Can you see the Hidden Treasure in this picture?

Or this one (different angle)


One more try...


Ok... let me give you a little history and then I will reveal the treasure. 

My great aunt Dean will be 90 years old this week.  She has crocheted most of her life. I don't think there is any way to ever find out how many table cloths, afghans, doilies, etc... that she has crocheted over all those years. 

This is Aunt Dean in the center with her son and Daughter.  This was taken 2 weeks ago at our Family reunion.


Aunt Dean brought 3 garbage bags of yarn and thread to the reunion to give to my Mom.  She said that her hands no longer let her crochet and she thought that Momma might get some use out of it.  Much to our surprise found in those three bags were 3 smaller bags of crocheted flowers. 

What a treasure! Look at this it took me almost 2 hours to lay them all out on my table. (click the picture for a bigger view)


There are big ones and small ones and some chained together and some crocheted on rings


There are solid colored ones and some with two and three colors. 


There are some made with cotton thread.

some are made of yarn.

I can only imagine the countless hours Aunt Dean spent making all of these flowers.  I have been so in awe of all of them I have left them spread out on my table for a week.  Every time I walked by and stopped to look I found something I hadn't seen before.  They are just beautiful.  A real treasure.

Happy Birthday Aunt Dean.  Thank you sharing your treasure with us.


Monday, July 18, 2011

Blueberry Crumb Cake

I had several cups of left over blueberries that had been glaring at me every time I opened the refrigerator door. I think they were saying "Hey Lady do something with us before we go bad". I started hunting for a recipe and came up with the following after combining a few that I found in a couple of different cook books.  I had to combine different recipes because I seemed to be missing at least one ingredient from each separate one and I had already made up my mind that I was going to stay in my comfy clothes and not fix my hair or makeup all day.  So, I was not going to the store. 

This turned out so good.  I think that it is my new favorite blueberry recipe.


Blueberry Crumb Cake

Cake
5 Tablespoons of butter
3/4 Cup of granulated white sugar
1 Egg
1/2 teaspoon Vanilla
2 Cups flour
2 and 1/4 teaspoons Baking Powder
1/2 Teaspoon Salt
3/4 cup of milk
2 Cups of blueberries (washed and patted dry)

Crumb Topping
6 Tablespoons of butter
1/4 cup of granulated white sugar
1/4 cup of light brown sugar
1/2 teaspoon of cinnamon
1/2 cup of flour
1/4 teaspoon of salt

Preheat oven to 350 degrees.  Grease a 9x13 baking dish. Combine the dry ingredients of the cake except sugar and set aside (Flour, Baking powder, Salt).  Cream together the butter and sugar.  Add the egg and vanilla to the butter and sugar mixture.  Alternate adding the milk and flour and mixing well.  Gently fold in your blueberries.  Pour batter in your greased baking dish. 

Mix together your topping ingredients.  I used a pastry cutter to cut these together.  Make sure it is nice and crumbly.  You may even have to get your hands into it.  Sprinkle this mixture over the top of your cake. 
batter.   Bake at 350 degrees for 40 minutes. 

I had to have the first piece while it was still warm it is sooooo good!  Add a little butter on top for a extra treat! I ate it for breakfast...  Eating something called "cake" for breakfast sounds bad but it  has made smile today...
~Sherry~

p.s. I am really excited about my next post.  I will give you a hint... It is a true treasure!

Sunday, June 26, 2011

Old Fashioned Gumball Machine Candy Dish

Every July we have a family reunion.  At the family reunion we have a craft sale where everyone brings their handcrafted items and sells them.  All of the sales go to pay for next years reunion. We rent a camp with cabins, pool, pond, cafeteria and lodge for 2 days and provide all the food.   It is loads of fun.  So, my next few posts will be all about what I have made to take to the reunion to sell. 

Today I made these gumball machine candy dishes out of a 4 inch terracotta flower pot and the dish it sits in, a glass bowl from dollar tree and a wooden ball.  I painted the flower pot and dish and the wooden ball all red with spray paint, glued the glass bowl onto the flower pot and glued the wooden ball on the bottom of the dish. 

~Sherry~